Showing posts with label regular braids. Show all posts

Monday, September 24, 2012

Royal Crown

Here's a style that's fun for any day.  You will want to make sure that you have a bun mold or rolled sock handy to help create your bun.  
Begin by pulling all of the hair back into a ponytail.  You can position your ponytail high or low on the back of the head.  It would be really cute up high if you were using it as an actual crown.  Now you have a choice of breaking up your ponytail at this point and creating several small braids out of it, or moving on like we did.
  We went ahead and pulled our un-braided ponytail through the bun mold and the created our smaller braids at this point.  Either way will work.  (Tip:  You only need to plait your braids down far enough to cover your mold - the rest of the hair can be left loose.)  
Create as many small braids as you like and have them spread out around your bun mold.  We have 9 braids on ours.  Once you have spread the braids around the mold you will secure them with another elastic that goes over the braids and the mold to hold everything into place. 
 You should now have the remaining hair hanging outside your bun.  (Remember that this hair should not be braided.) Break that hair up into about three groups and plait three individual braids out of it.  Wrap those braids around the base of your bun and secure them into place with bobby pins.  This creates the bottom of your crown.  Pretty simple and cute! 

Wednesday, August 29, 2012

School Starts Style

School started this week and my little princess has been so excited to get back and see her teachers and friends.  I have been excited for a routine to set in so I can get back to posting on this site!
This was her hair for her first day back and it was a simple, yet darling style:
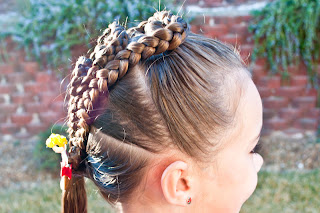
Begin by creating an off-centered part at the front of the hair.  Create a section on both sides going from the part down to the ears and secure each with an elastic.
Now create a Regular 3-Strand Braid out of those two small ponytails and have your princess hold onto each once they are done.  Divide the rest of the hair into two areas by creating a part directly down the center.  Begin with the left half and gather it all together into a ponytail - making sure to bring across the right side braid and include that into the ponytail as well.  
Do the same with the right side, remembering to bring across that left braid and add it in.  Comb out any remaining braid on each side.  You should now have two ponytails.  Create another Regular 3-Strand Braid out of each. 
 Bring the bottom of one of your braids up to the last elastic and create a puppy dog ear by securing it up with a new elastic.   Puff out any excess hair over the elastic.  Do the same thing with your other braid and you're all done! 

Monday, July 16, 2012

Braid Roll

It does not get much more simple than this!  It's called the Braid Roll and it's a great one to do on your own hair because it's so easy. 
Begin with wet hair and pull it all back into a ponytail.  Your ponytail can be high, low, or centered.
Now simply braid the entire ponytail VERY loosely.  You do not want tight uniform plaits.  I would just stick with a Regular 3-Strand Braid because you don't want to much clutter going on with this bun.  Make sure to plait all the way down to the very bottom of the hair and then secure it with an elastic. 
 Now gently wrap the braid around that top elastic to begin and then around itself until all of the braid is up on the head.  You can add bobby pins as you go along to secure it into place.  It's not supposed to be a tight bun so remember to keep it loose. 
Tuck your ends under the bun and secure it with a couple final bobby pins.  It's elegant and simple and what could be better than that? 

Wednesday, July 11, 2012

Magic Wand

Today we have a really easy style that you can take pieces of to dress up any average ponytail.  First you will want to pull all of the hair back into a ponytail.  It can be low or high - doesn't really matter.
  Now grab a Topsy Tail and divide the ponytail into 3 equal parts, 1 in the top middle and two on the sides.  Begin with that top middle piece and feed it through the loop of your Topsy Tail.  Poke the tool down behind the elastic and pull the hair through.  Hold on to a bit of the hair that is closest to your elastic so that is does not get pulled all the way through with the rest of that section.  This will create a little bump right at the top of your elastic. 
Now take one of your side sections and repeat the steps, just making sure that you feed your Topsy Tail sideways behind the elastic.  Take your final piece and create your last side bump.  Now you will have three sections of hair coming out of the ponytail, behind the elastic. 
 
You can stop at this point and curl the ends if the hair is not too long.  For the longer hair you can use the three sections to create a Regular 3-Strand Braid. 
The braid will be the stick of the wand and the puffs above will be the top.  You could even jazz it up with some spray glitter if you wanted to.  :)

Monday, June 4, 2012

Side Braid Bun

This is not a new hairstyle by any means but it is the first time we have ever done it.  You only need to know how to do a basic French Braid (We have a video for that here ) and all you need is one elastic, some bobby pins, and a flower clip.  This hairstyle actually looked a bit better when it was done with dry hair but we did use extra hairspray when doing it dry so that we didn't end up with a ton of fly-aways.
We started by creating an off-centered part at the front of the head that was about 2 inches long.  We started on the smaller side of the part and grabbed a section of hair that was divided into 3 equal sections.
This is where you will begin your French Braid.  Just make sure that your Braid goes across the back of the head rather than down the head.   
Work your way around to the other side of the head and gather in the remaining hair.  Once it's all been added in, finish plaiting the braid with just a Regular 3-Strand and then secure it at the bottom with an elastic. 
Wrap that 3-Strand Braid around itself and secure it against the head with bobby pins.  Make sure that you have all of your ends tucked under the bun so they won't show.  Add a flower clip to the front of the bun and it's finished. 

Wednesday, May 30, 2012

Back & Forth Puffy Braids

This style is a variation on one of our favorites, Puffy Braids.  You will be creating a series of horizontal parts as usual but the difference is that there is no vertical part down the center.
 
Start by creating a horizontal part from ear to ear and making a small section of hair along the bang line.  Secure it into an elastic that is pulled to the left side.  Now create a parallel part behind the first that you will secure into an elastic over on the left side. 
Create a 2 inch braid out of your left ponytail and have your princess hold it while you create a third parallel part/section.  Pull that section over to the left as well and add in the braid before securing it with a new elastic.  (Your braid will be lying over the top of your second section that is over on the right.)
Now move over to your right ponytail and create a 2 inch braid out of that as well.  Create a 4th part/section and pull it to the right where you will add in that braid and secure it with an elastic.
Now move back to the left and repeat the pattern back and forth from left to right. 
When you get to the bottom of the hair you will have one braid that ends higher than the other.  Finish off your final ponytails with Regular 3-Strand Braids and you are all finished! 

Wednesday, May 9, 2012

A Rose for Mother

This is our version of a little rose on the back of the head especially for mom on Mother's Day.
  Begin by sectioning out the hair on the top of the head from ear to ear.  Go ahead and create a part in that new section so that you end up with two halves.  Plait each half into a Regular 3-Strand Braid and secure them at the ends with elastics.  Now pull the rest of the hair back into a ponytail.  Break that ponytail into two equal sections and braid each of those as well.  You should now have 4 braids.
  Take your two top-side braids and cross them over the top of the middle elastic and then wrap them around each other in no particular order so that it makes a bun with the middle two braids still hanging down in the center.  The ends of your braids should be flaring out underneath the bun and you can secure them together with another elastic. 
Now take your right center braid over the bun and tuck it underneath the right side braid that is coming across the head.  Do the same with the left side as well.  Form them both into little leaves on the side of your bun and then wrap the remainder of those braids in with the rest of the bun to create your rose.  Have the ends of those two braids flare out underneath the bun as well and secure those in with the other ends by using one last elastic.  Tie a colored ribbon over those elastics to hide them and you're all set!

Monday, April 30, 2012

Messy Braids

You've all heard of Messy Buns but here are some Messy Braids. 
These are very simple and need to be done with dry hair.  Simply braid the hair with Regular 3 Strand Braids and make sure to plait just past the halfway point and then secure it with an elastic so that the rest is still loose. 
 Now slowly start pulling those plaits loose - working from the bottom plaits up toward the top plaits.  They should not look even and should look more disheveled and messy. 
 Most of the hair that was previously left loose under your elastic will be pulled back up into the braid as you play with it but make sure to leave enough hair beneath the elastic so that the braid does not com apart. 
You will notice that the braid really fattens up when doing this process and actually has a really pretty look to it.

Wednesday, April 18, 2012

Wrap It Up!

Some of the prettiest styles are created by simply giving everyday styles little additions.  This is a basic ponytail at the core but we've added a few things here and there.
Start by sectioning out a thin area of hair along the bang line from ear to ear.  Using wet hair will yield the best result for you.  Now pull the rest of the hair back into a tight ponytail.
Now divide that front section into 3 areas.  We've done ours with a little larger area in the front and smaller areas on the sides but you can separate it however you like just as long as you have 3. 
 Twist each of the sections and pull them back to the elastic that is holding your ponytail and wrap each one around the elastic only once.  Make sure that two of your twists go to one side and the other goes to the opposite side. 
 Also be sure to have one twist go above the elastic and one below as you wrap on the side with the two twists.  The side with only one twist will actually wrap around 1 1/2 times so that it ends on the same side of the elastic as the other two.  (It does not matter if you wrap this one above or below the elastic.)
  Now take all three of those twist and braid them into a Regular 3-Strand Braid right outside the elastic and this will secure those wraps in place.  Take that braid and wrap it around the ponytail as many times as you can and then wrap an elastic around the ponytail where the braid ends to secure it in place. 
 Grab a small strand of hair from the back of the remaining ponytail and wrap it around that new elastic to conceal it.  (You should only have to wrap it around a couple times.)  Use your Topsy Tail and poke it through that elastic and pull the ends of that new wrap through and back into the ponytail.  This will secure it tightly.  Now braid the remaining ponytail into which ever braid you like.  We've just done a Regular 3-Strand Braid here.  Secure it at the bottom with an elastic.  Conceal that last elastic the same way as your previous elastic with a strand of hair from the back wrapped around and pulled through with your Topsy Tail.

Wednesday, February 22, 2012

That's A Wrap

Here's a different kind of ponytail wrap for you.  It's very simple and has a neat effect.
I started this hairstyle by sectioning out the top part of the hair from ear to ear and then dividing that into two parts.  I made a Pull-Through out of each part and then a Regular 3-Strand Braid out of each Pull-Through. 
I then pulled the two braids to the back of the head and combined them with an elastic and unplated any remaining braid after that elastic.  I then gathered all of the hair that was down into a ponytail - making sure to exclude the small ponytail from my two braids. 
I left the large ponytail alone and grabbed my smaller ponytail from my braids and added a new elastic about 1 inch below my first.  I then added 4 more elastics, separating each of them by about an inch.  Now my small ponytail had 6 total elastics - one securing my braids and then 5 others about an inch apart. 
 I grabbed my Topsy Tail and poked it directly through the middle of the first inch section of my small ponytail.  I did this by bringing my Topsy Tail in from behind this first time.  Now feed the large ponytail through the loop on your Topsy Tail and pull it all through that first section on the small ponytail.  Now you're going to feed your Topsy Tail through the second small section by feeding it from the front this time.  Place the large ponytail through the loop and then pull it through that section.  Continue doing this - alternating feeding the Topsy Tail from behind and from in front.  Once you have finished pulling the large ponytail through all of your sections you can combine the two ponytails with one final elastic at the bottom.  Add a hair clip and you're finished! 

Friday, February 10, 2012

Friday's Film: Triple Heart

This is a new hairstyle that my princess thought up this year and she named it the "Triple Heart". 
It's a really simple idea but I wanted to show you how to create the individual parts and then let you see how it is assembled.
Here are some pictures of the finished product.
This side view help you see how I divided the top sections before creating the Pull-Throughs.
I only left about 2/3 of the hair out on the bottom and used the rest for the tops of my hearts.
Once you make your Pull-Through, separate the two braids on either side to create the top of your heart.
Bobby pin the hearts into place once you've created the shape that you want. 
The last step is to add a fun Valentine's hair clip.
Now your princess is all ready for her big day - plus you will get some beautiful waves out of these braids for the next day!

Wednesday, February 1, 2012

Heart Topper

When you're running low on time and you want to add a nice touch to your average hairstyle, try topping your ponytail or piggies with a heart.  This is a great idea for Valentines Day and it takes less that 5 minutes. 
Begin by pulling all of the hair back into a ponytail.  (Or two piggies, a bun, a side ponytail, or whatever you like.)  Now grab a small section of hair from that ponytail and make sure you grab it from on top.  Tie a small clear elastic around that section about 1/4 inch below the main ponytail elastic.  Using your Topsy Tail, create an Inverted Pull-Through by sticking the point of your Topsy Tail underneath your section of hair so that it point upwards behind the elastic.  Pull the small section through the loop on your Topsy Tail and ten pull it all the way through.  Separate that small section into two equal halves and twist each side instead of leaving it flat and that will help it hold it's shape better.  Create a small arch on each side for the top of your heart and then combine the two sides just below that second elastic.  Secure those two ends and the rest of your large ponytail into place using another clear elastic. 
Now your Heart Topper is finished and you can complete your ponytail with whatever braid you like.  We've just done a Regular 3-Strand Braid here. 
In a few days we will be doing a whole new hairstyle using this ponytail-heart technique so keep checking back because it will be cute!