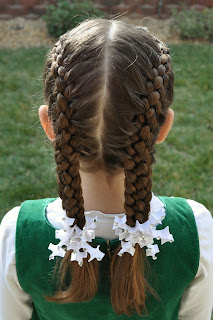
Showing posts with label french braids. Show all posts

Friday, December 7, 2012

Friday's Film: Formal Ponytail Wrap

I originally saw a similar idea to this on Pinterest and I absolutely loved it!  
Ours is just a bit different but you can see how this way may be a bit simpler.  The link to this original pin can be found here.
The French Braid is not necessary but I do really like the look that it gives.  You could even pull this off with a twist instead of a braid if you like!
This picture shows you how we sectioned the hair.
Here's a view of the other side and the wrap.
My princess loved this hairstyle so much that I'm sure it's going to be a new regular for us!

Friday, October 19, 2012

Friday's Film: Double Fancy French Wraps

After our post on Wednesday we had a lot of feedback and everyone said the same thing, "We need a video!"  :)  (You can find that original post here.) We decided to create a bit of a new hairstyle out of the same thing so we created two wraps to switch it up a little but the concept is the exact same. 
I tried to avoid the spotlight because it causes so many shadows but it still seems dark.  I'm working to fix this problem in the future!  Hopefully you can still get the general idea.
Here is what the finished Double Fancy French Wrap looks like.
Here's a view of the "French" part where the hair has been added in.
This is what the top of the style looks like.
Here's a closer view of the wraps and they look nice but I have to say that I prefer the look of the wraps when the style is done in single form as opposed to double.  A thicker ponytail looks a bit better.  This is still nice though.  :)  

Wednesday, October 17, 2012

Fancy French Wrap

This style looks amazing and the best part is that it's SO SIMPLE!  Start with wet hair for the best results.
Begin by sectioning out the top half of the hair from ear to ear and pulling it into a ponytail.  (You should literally have half of the hair in this ponytail.)  Make sure your ponytail is nice and smooth.
Now section out two small areas on each side of the ponytail - underneath that secured top half.  Cross the two sides over the top of your ponytail and then around and underneath it.  Continue wrapping those strands around the ponytail until you get down to the bottom where you will secure it with one small elastic.  Now Grab two more small areas on each side of the ponytail, just below your previous ones and repeat the wrapping steps. 
 Be careful in your placement of the wraps.  You want your new warps to lie directly above your previous wraps to get the desired look at the end.  Once you have wrapped those two new strands all the way down to the bottom of the ponytail,  Secure it in place with another small elastic.  (Or you can just reuse your previous elastic.)  
 Now grab your remaining loose hair on each side of the ponytail and create one final layer of wraps going down the ponytail.  Secure that at the bottom with one final elastic.  We added a small ribbon on our first elastic but you can decorate the hair with any accessories you like.  :) 

Friday, September 7, 2012

Friday's Film: French Knot

This is a style that we kind of came up with on the spot this morning and decided that it would be a great video to share because it's an easier way to create a French Braid type of style.  
I apologize for the messiness of some of the video, my princess has extremely long hair and sometimes it looks super tangled.
 The hairstyle itself is really beautiful and it's nice because it's one that you can do on yourself as well.  (Not too many strands to keep track of.)
This shows the top of the braid and what it looks like as it gets started.
The bottom side of the French Knot tucks under while the top side tucks over and inside.  
We did our braid on an angle so that it ended as a side ponytail but the orientation of your French Knot is totally up to you.  
We added a flower clip to conceal our elastic on the side and that finished it off nicely.   

Monday, June 4, 2012

Side Braid Bun

This is not a new hairstyle by any means but it is the first time we have ever done it.  You only need to know how to do a basic French Braid (We have a video for that here ) and all you need is one elastic, some bobby pins, and a flower clip.  This hairstyle actually looked a bit better when it was done with dry hair but we did use extra hairspray when doing it dry so that we didn't end up with a ton of fly-aways.
We started by creating an off-centered part at the front of the head that was about 2 inches long.  We started on the smaller side of the part and grabbed a section of hair that was divided into 3 equal sections.
This is where you will begin your French Braid.  Just make sure that your Braid goes across the back of the head rather than down the head.   
Work your way around to the other side of the head and gather in the remaining hair.  Once it's all been added in, finish plaiting the braid with just a Regular 3-Strand and then secure it at the bottom with an elastic. 
Wrap that 3-Strand Braid around itself and secure it against the head with bobby pins.  Make sure that you have all of your ends tucked under the bun so they won't show.  Add a flower clip to the front of the bun and it's finished. 

Friday, May 18, 2012

Friday's Film: Skinny French Braid

Here's a fun hairstyle that I originally saw on Pinterest and that direct link is here.   I was unable to find any directions for it so this is what I came up with and the end result seems to be the same. 
We already have a hairstyle called "The Overlay Braid" so we didn't go with that name but it would definitely apply here as well.
Here's a picture of what the finished braid looks like.  It looks awesome over the top of the other hair!
Here is the back with the braid wraps around the piggies.
The top was kind of hard to see in the video so here's a picture of what it looks like. 
Here's another view of the braid.  Fun huh! 

Wednesday, May 16, 2012

The Bow Braid

This hairstyle is one that I've been following on Pinterest but could never quite figure out and the AMAZING Mindy over at Cute Girls Hairstyles posted a great video that you can find here.  Full credit goes to her and her perfect instructions that make this braid very "do-able".  She also got some fabulous variations that show the versatility of this braid.  Here's our version:
First we separated the hair directly down the middle of the head and created The Bow Braid out of the left half of the hair.  (The link to the instructional video from Mindy is above.) 
I absolutely love the look of this braid and the idea to it is really quite simple.  It does take some time so plan appropriately.  This hairstyle was supposed to have a Bow Braid on each side but we ran low on time so we came up with this instead. 
We added in the hair from the right side to the bottom of our Bow Braid and swept it over below the right ear.  We did this by doing a Half-French Braid and only adding in hair to the top half. 
We finished it off with a Regular 3-Strand Braid and secured it with an elastic and a little flip at the bottom.  
Remember to check out Mindy's fun variations because she's got some great ideas!

Friday, May 11, 2012

Friday's Films: French 4-Strand & French 5-Strand

We've had more than a few requests for these videos so I'm finally getting them up for you. 
First of all we have the French 4-Strand:
 Hopefully that makes sense for you and will help.
Here's a picture of the finished French 4-Strand.  This is cool because it's half a French Braid and half a Dutch Braid!
You can see that this side is the "French" half.
And this side is the "Dutch" half.
We just finished it off with a 4-Strand Braid and secured it with an elastic. 
Next we have the French 5-Strand:
The fingering it definitely a bit more tricky as you plait this braid but it is one that gets much better after a couple practices.
 
Here's a picture of one of our finished French 5-Strand hairstyles and you can find the original post for this one here.
There is also this hairstyle that we did a couple weeks ago and it's a diagonal French 5-Strand.  That original post is here.

Friday, April 27, 2012

Friday's Film: Layered Triple French Braid

I've seen ideas of this hairstyle on Pinterest but I never originally pinned it so I can't for the life of me find a link to a picture.  I wish I could give credit where it's due but I have looked all over and I'm at a loss.   This style is very beautiful gets better and better with practice.

This video was my first attempt at trying this style and I've since done it a couple times and have to say that it's gotten much easier and it is much smoother.
You can see how it all comes together and looks really pretty.
Plait your side braids an equal amount of times so that your middle braid will have the right amount of strands to add in. 
Your side braids will be a bit smaller than your middle braids but there should not be too much of a difference. 
Here is what the top of the hair looks like along the bang line since it was really hard to see in the video.
I ended it by adding in the two small braids from the sides in (I made sure there was no plaiting after the last strands were added in.) and then finished it off in a Regular 3-Strand Braid.

Friday, April 13, 2012

Friday's Film: French Fish Bone

We had a request for a tutorial on the French Fish Bone Braid.  This is a VERY simple braid but is so pretty. 
This braid also created some pretty waves for the following day!
These are the Scunci "Evolution" bands that I bought and used in this video.  I absolutely love them because there's no twisting, they come out easily, and they don't rip the hair.  I got mine at Smith's grocery store but I'm sure they can be found all over. 
We also use these Scunci elastics ALL THE TIME and love them because they are made out of the same stretchy material that doesn't fall out or rip the hair when removed.  We grabbed these ones at Walmart and these are our favorites.
We also love these little Goody clear elastic for the smaller piggies because they are STRONG!  We also bought these at Walmart.
Here's a picture of the finished product from today's video.
This is a previous post where we did two of these braids.  You can find that post here.
We've done this technique before with out "Something's Fishy" hairstyle and you can find that original post here.  We just secured our two section into elastics at the end without braiding any further.
 Here is the original post on our regular Fish Bone Braid.  You can see that I have gotten much better at doing them as I've practiced so don't get discouraged if it's not perfect at first.  :)
There is also our "I Wish it was a 'U' Instead of a 'Y'" hairstyle and that original post is here.  This uses two Fish Bones that combine into one.

Wednesday, April 11, 2012

Diagonal French 5-Strand

For Easter this year my princess decided on the hairstyle that she wanted.
(Please excuse the loose strands of hair - it was a VERY windy day and I didn't take pictures until after they had been outside hunting Easter eggs for a while.)  :)
 She loves 5-Strand Braids so she chose this Diagonal French 5-Strand.
We've done these French 5-Strands before and you can click here to see that original post but this one was just a bit different.
We started on the left side of her head by gathering a small area of hair that was divided equally into 5 strands.  (You will want to know how to create a 5-Strand Braid before attempting the French version and we do have a tutorial video here.
We worked our way from the top left part of the head down to the bottom right part of the head, gathering new sections of hair into only the two outside strand of the braid each time it was plated.
When all of the hair was gathered we finished plating the rest of the hair without adding strands in.  An elastic was placed at the bottom of that braid to secure it and then we tucked that end up underneath the French part of our braid and bobby pinned it into place. 
We added some hair pins that matched her dress and she was all set for Easter Sunday.