Showing posts with label parts. Show all posts

Monday, December 10, 2012

Triple Braid Bun

Here's another fun Pinterest one that has been floating around.  It's really simple and has a beautiful look:
 I have to admit that I LOVE this with the blonde highlights in this girl's hair!
Start the style by sectioning the hair out into 3 horizontal sections and secure each section with an elastic.  *You can choose to leave some hair out like in the example which you can curl for a more formal look.
Now take each of your three ponytails and create a 3-Strand Braid out of them - securing each of your braids with an elastic at the bottom. Starting with your top braid, wrap it around it's elastic so that you form a bun and then secure the ends of your braid with bobby pins by tucking them underneath he bun.
The length of your princess's hair will determine the size of your bun.  If she has shorter hair, you can keep your braids looser  to give the bun a more full look.  Add a flower to the side as an accent if you like and the hairstyle is complete!

Wednesday, May 30, 2012

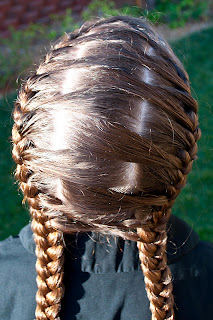
Back & Forth Puffy Braids

This style is a variation on one of our favorites, Puffy Braids.  You will be creating a series of horizontal parts as usual but the difference is that there is no vertical part down the center.
 
Start by creating a horizontal part from ear to ear and making a small section of hair along the bang line.  Secure it into an elastic that is pulled to the left side.  Now create a parallel part behind the first that you will secure into an elastic over on the left side. 
Create a 2 inch braid out of your left ponytail and have your princess hold it while you create a third parallel part/section.  Pull that section over to the left as well and add in the braid before securing it with a new elastic.  (Your braid will be lying over the top of your second section that is over on the right.)
Now move over to your right ponytail and create a 2 inch braid out of that as well.  Create a 4th part/section and pull it to the right where you will add in that braid and secure it with an elastic.
Now move back to the left and repeat the pattern back and forth from left to right. 
When you get to the bottom of the hair you will have one braid that ends higher than the other.  Finish off your final ponytails with Regular 3-Strand Braids and you are all finished! 

Wednesday, November 2, 2011

Cross Over Braids

 This is a fun twist on an old favorite.  You can do this style with either French Braids or Dutch Braids but we have used French Braids here.
  Begin my making one part right down the middle of the head.  (Starting with wet hair usually works best.)  Now create two parallel parts - one on each side - about an inch from the original part.  You should now have two long and skinny sections. 
Separate the sections into small pieces that you will cross over the opposite side in an alternating pattern.  I used a couple of over sized alligator clips to hold the crossed pieces in place until I was ready to use them.  Once both parts have crossed through each other and are now on the opposite side of the head from where they began, you can start your French Braids. 
Start on the right side of the head and begin plating the hair at the bang line.  Add in the crossed over pieces into your braid every other time you plate on that side.  Pull them nice and tight.  Once you have added all the hair in, continue plating the braid down to the end and secure it with an elastic. 
 Move over to the left side of the head and repeat the steps. 
 This hairstyle can be a bit tricky when trying to keep the crossed pieces where they belong but the alligator clips worked well for me and I just removed them as I began plating my braids.  You can see that the finished product has a really cool visual effect. 
 Add some hair clips to the bottom of your braids and you're finished.   

Monday, September 19, 2011

Go Utes!

In honor of this weekends fabulous game, we decided to come up with a Utah Utes "U" hairstyle.  (Sorry all of you BYU fans!)   :)  We had church the day after the game and we've had a friendly rivalry going on with some of our church members.  Of course, we had to rub in our victory just a bit!  :)  Our whole family wore red to church and we came up with this red "U" for my princess's hair.  *This is one hairstyle that I'm PLEASED to say was not well received by some!*
I started by dividing the hair in half with a part and we chose to do a zig-zag part.  Next, I pulled each side up into a ponytail and then finished them off with a 3-Strand Braid.  I secured each braid at the end with a clear elastic and then I took those elastics across to the opposite side and secured them into the top of the other braid.  I found the best way to secure them was to lift part of the original top elastic and feed the bottom end of the other through. 
 I then bobby-pinned the ends under the braids.  I wrapped some red ribbon around the two braids and tucked the ends of the ribbon through the elastics to hold it in place. 
 Our finishing touch were the coordinating ribbons.  :) 
For those of you that are BYU fans, you can check out this style:
I call it the Wish it was a "U" Instead of a "Y". 
It would be cute with blue ribbon wrapped around it as well. 

Monday, August 29, 2011

Baptism Picture Hair

My princess is getting baptized at the end of this week and we wanted to get some pictures taken for the invitations.  This is the hairstyle that we came up with:
First I completely dried her hair and then I began by creating an off-centered diagonal part in the front.  (I had more of the bang-line on the right side of the diagonal.)  I then sectioned out the hair from one ear to the other so that I was only working with the top half of hair. 
I tied off the left side of my diagonal part so that it was out of the way while I worked with the right.  You'll want to create four even sections out of that side and make sure they run parallel to the diagonal part.  Secure each small area with an elastic at the back of the section. 
 Now move over to the left side and create 5 equal sections. 
 My first 3 section came straight off of the diagonal part instead of running parallel to it.  This just breaks up the design a bit.  Secure each of those areas with an elastic at the back of the section as well. 
 Now you should have 9 small ponytails at the top of the head.  Take each of those ponytails and cross them over and under each other in a weaving pattern.  Go ahead and secure the ends together at the back of the head with bobby pins creating an "X".  
You can either leave the remaining hair straight or curl it like we've done here.  We used a spiral curling iron to get these ringlets. 
We finished it off by giving it a good spray with hairspray and then adding some flower hair pins and velcro pearls. 
The hair not only held up through her photo shoot but all the way through the end of the day too. 
The pictures turned out great and she's very excited for her big day this Saturday!

Friday, August 5, 2011

Knotted Crown

My princess came up with the idea for this one and wanted to give it a try.  This hairstyle is easiest with wet hair.  
Start by making a straight part on the top of the head that goes all the way back to the crown.  The part can either be directly in the center of the head or a little off-centered like we've done here. 
 Now section out 3 parallel areas on one side of the part and secure each area into an elastic, giving you 3 parallel ponytails.  Move to the other side of the part and do the same thing.  Now make 3 more vertical sections going around the back that you will also secure into ponytails.  
Start with the back-center ponytail and wrap it around itself then pull it through the middle, creating a knot over the elastic.  
Now move to the adjacent two ponytails and create knots out of them as well.  (I had my princess hold the ends of my knotted ponytails until I secured them so they would not fall out.) 
 Pull the remaining hair from those two knots to the back knot and secure them in with that ponytail - just below the knot - with a tight elastic.  Move up to the next two adjacent ponytails and do the same thing. 
 Finish knotting the rest of the ponytails and adding the remaining hair into the back ponytail as shown here. 
Add some hair clips over the ponytail to hide all of the elastics. 
It turned out pretty cute and she was so proud of her creativity! 

Friday, July 1, 2011

Flashback Friday: Pajama Day

This is our final Flashback Friday and it's been fun to add a few of these old hairstyles into the mix.   On this particular day my daughter's school was having a "Pajama Day". 
We had talked about how she would be wearing things that she wore to bed and she quickly piped up and suggested that we put pink curlers in her hair since she wears those to bed.  I thought that was a great idea and so she went to school with pink overnight curlers in her hair.  She was quite the hit at school and she had darling curls when we took them out! 

Friday, June 24, 2011

Flashback Friday: Flipped Piggies

I love this style and there is really nothing to it. 
 We separated her hair into two equal halves by creating a zig-zag part down the middle of her head.  Each side was pulled up into a piggie and then we pulled out the large fat curling iron. 
We curled the ends of the piggies so that they flipped out and then topped each one off with a bow.  She had a program at church that day and she looked darling for it.

Monday, June 13, 2011

Smorgasbord

So this hairstyle is a little bit of everything, hence the name.  Start by sectioning out the top area of hair by creating a part from ear to ear.  Divide that area into two sections by parting it a little off-centered.  Now you will have two sections of hair, a large one and a small one.
  Go ahead and begin with the large one and divide it into two parallel pieces.  Dow divide each of those smaller sections into two pieces and ties them into a half-knot.  Have your princess hold the extra hair while you move over to the smaller side and repeat the same steps.  You should now have four half-knots.  Have your daughter hold the hair from those half-knot while you move on.
 
 Divide the remaining hair down the middle using any part that you like.  We have used the zig-zag part here. Pull each side up into a piggie. 
 Now go ahead and take the hair from your princess and add the strands closest to the right ear directly into the right piggie and secure it with another elastic.  Also take the strands closest to the left ear and add them directly into the left piggie.  Now take those middle strand from the 4 half-knots and criss-cross them over each other in any fashion you like.  Have the strand from the right knots be eventually added over into the left piggie and the strands from the left knots be added over into the right piggie.  (Hopefully that makes sense.) 
 I went ahead and finished off the style by creating a Quad Braid out of each piggie and folding it up under itself to make a Puppy Dog Ear. 
 I added a flower clip directly over the elastics and ends of the braids to finish it off. 

Wednesday, May 4, 2011

Princess Dreads

My princess had dance picture scheduled right after school.  It was a P.E. day for her at school and I knew I would only have enough time to through her costume on and get to the studio.  This left me the problem of figuring out how to do her hair and still have it look good by the end of school.  I decided to do some dread lock braids in her hair because I could easily have her unplate them in the car as we drove to the studio and then I could run a quick brush through it and be done!  Problem solved! 
 I started off creating some small pulled ponies at the top to help keep the hair out of her eyes. 
 There were two sections of these ponies and I made sure that they were pulled in separate directions for a nice look.
  From that point I started sectioning out pieces of hair with the rat-tailed comb and creating 3-Strand Braids.  I braided each section as low as I could and then secured it at the bottom with an elastic. 
 I did this all the way around the head and ended up with 28 individual braids.  (Now this did take some time so make sure you plan accordingly.) 
The kids at school thought her hair was so neat and kept wanting to play with it.  I changed her into her costume at school and then hopped in the car to head out.  My princess had half of the braids unplated by the time we got there and I quickly helped unplate the rest.
 We ran a quick brush through it - this helped loosen up the waves - and she even had 5 minutes to spare!  :) 
Her pictures turned out great and she was even able to wear it like that the following day.