My princess had a choir performance today where she was required to wear a winter hat so we decided to come up with a cute hairstyle that would work with her hat. We came up with this Braid Embellishment:
It's a simple way to add some flair to any braid or ponytail.
You can see how it makes these simple braids look adorable!
These embellishments will look different every time you do them so don't worry about having them look exact. There's beauty in variety. :)
I originally saw a similar idea to this on Pinterest and I absolutely loved it!
Ours is just a bit different but you can see how this way may be a bit simpler. The link to this original pin can be found here.
The French Braid is not necessary but I do really like the look that it gives. You could even pull this off with a twist instead of a braid if you like!
This picture shows you how we sectioned the hair.
Here's a view of the other side and the wrap.
My princess loved this hairstyle so much that I'm sure it's going to be a new regular for us!
This is a very simple style that you can do any morning and not have a huge time commitment. You will need a stretchy headband and a Topsy Tail if you have one but it's not required.
Pretty simple huh!
Here's what the back looks like.
Here's a shot of the side that wasn't shown in the video.
You can choose any sort of fancy stretch band to use.
I love hairstyles that are fast and easy!
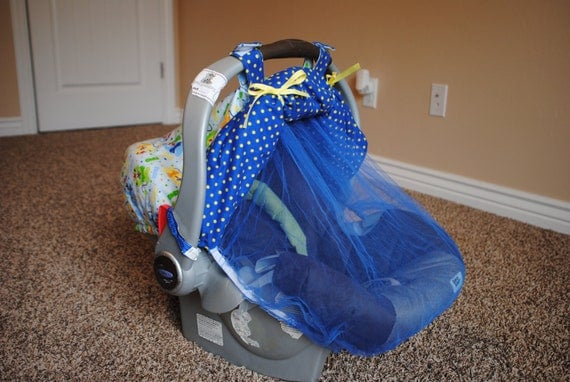
*AWESOME PRODUCT ALERT*
So I don't promote really anything on this blog but you have to check out these car seat canopy's with the bug covers. They are FANTASTIC and I have loved mine! My cute sister-in-law makes them and you can see her shop on Esty here so go check it out!
We had a request from one of our Facebook followers that we do some of our basic videos to help those that are a bit newer to the hair scene. :) Here is a video of one of our favorites, the Puffy Braid:
I hope that helps make it a bit easier for you.
Here is the finished hairstyle. You can use all the hair and create one large Puffy Braid as well instead of separating it into two halves.
Here is the top view that shows how all of our parts are uniform coming off of that main center part.
This is a side view so that you can see a bit better how we were sectioning the sides of the head.
Finish it off by adding some fun hair accessories.
After our post on Wednesday we had a lot of feedback and everyone said the same thing, "We need a video!" :) (You can find that original post here.) We decided to create a bit of a new hairstyle out of the same thing so we created two wraps to switch it up a little but the concept is the exact same.
I tried to avoid the spotlight because it causes so many shadows but it still seems dark. I'm working to fix this problem in the future! Hopefully you can still get the general idea.
Here is what the finished Double Fancy French Wrap looks like.
Here's a view of the "French" part where the hair has been added in.
This is what the top of the style looks like.
Here's a closer view of the wraps and they look nice but I have to say that I prefer the look of the wraps when the style is done in single form as opposed to double. A thicker ponytail looks a bit better. This is still nice though. :)
This is not a new hairstyle for us but we have never posted a video on it.
This is our original Uneven 5-Strand Braid and you can find the link for that post here. We also have a "pulled" version of the braid and you can find a link to that post here.
This video should help give you the idea of how we divided our strands and created the braid.
Here is the finished braid from this video. Try it out! It's a fun braid and really quite easy with a bit of practice!
I was on Pinterest and cam across this cool tutorial for rope braiding and this one is called a Sennit Braid. you can find that original pin here. I pinned it thinking it would be awesome to make a hair accessory or jewelry but then got to thinking that it could probably be used for a hairstyle as well.
I did a bit of re-configuring with the strand and came up with this 7-Strand Sennit Braid:
Hopefully the video was able to explain it well for you. As always, practice makes perfect with this braid.
Here is what it looks like totally complete. You can see that it looks like 2 side-by-side braids. We have a couple other versions of 7-Strand Braids as well and I've listed those below with links to their original posts. Just click on the name and it will take you over.
This is a style that we kind of came up with on the spot this morning and decided that it would be a great video to share because it's an easier way to create a French Braid type of style.
I apologize for the messiness of some of the video, my princess has extremely long hair and sometimes it looks super tangled.
The hairstyle itself is really beautiful and it's nice because it's one that you can do on yourself as well. (Not too many strands to keep track of.)
This shows the top of the braid and what it looks like as it gets started.
The bottom side of the French Knot tucks under while the top side tucks over and inside.
We did our braid on an angle so that it ended as a side ponytail but the orientation of your French Knot is totally up to you.
We added a flower clip to conceal our elastic on the side and that finished it off nicely.
We have had several requests for a tutorial on this hairstyle:
This picture was sent to me from one of our friends on Facebook and absolutely love the style. I wish I knew it's origin so I could give credit where credit is due. You'll notice how complete perfect this picture above looks. Well, mine was not as great (this was my first attempt) but I'm sure it will get better with practice. :)
Something very important that I wish I had been better with is making sure to hold the strand tightly so they don't loosen up. You will see that ours loosened a bit and I was kicking myself that I wasn't more careful about that.
I should have kept my add-in strands smaller like in the example picture and then I would have had more crossing hairs as well.
I started our hairstyle a bit farther back on the head than in the example but you can do it however you like.
To finish it off I simply wrapped a small strand of hair over the elastic to conceal it and then poked a Topsy Tail through the elastic, threaded that strand through it, and pulled in in tightly so that it was secure.
It's a very beautiful hairstyle and hopefully this tutorial helps those of you that were looking for some instruction!
So I was watching the video from last Friday of our Inside Out Bun. You can find that original post here. I realized that there is a much easier way to accomplish the same desired look. Here's a video that will same you some time on your Inside Out Bun:
See, now wasn't that much easier?!
Here's a pictures of our new Inside Out Bun and you can see that it looks just like the first.
I will always take the easier edition if it looks just as good! :)
Today's video is something a little new. I decided to introduce myself to you and let my princess speak a little bit because sometimes the videos get a little redundant and it's nice to see the face behind the styles. :)
This hairstyle is called "Inside Out Bun" and it's basically one bun inside another. The center bun is created using a bun mold and the outer bun is creating using Barrel Rolls.
It's fairly simple but you do want to be sure that you're working with wet hair because that will make all the difference!'
Here's a picture of the finished product.
The Barrel Rolls around the outside can be made as small or as large as you like.
Make sure you have plenty of bobby pins handy to secure all your pieces.
You can see that the bun also resembles a flower a bit.
It was fun introducing ourselves to you and we hope that you continue to enjoy our posts and our videos. :)
My princess absolutely loves this new style and has requested to wear it again already. These darling buns form the perfect flower. You can always do just one bun instead of two as well.
See how easy that was! It looks great with hair that's not as long also but you may want to divide your ponytail into more than just 4 sections so you get lots of "petals".
Here's a view of the zig-zag part we used. Feel free to use any part you like.
You can see that our flower has several petals because of how long my princess's hair is.
I've gone ahead and tucked all my final ends up into the bun but you could leave them shooting out which is also cute.
The flowers are going to look different every time you do this hairstyle but they are always cute!
You can tell that this is her new favorite style! :)