Thursday, October 21, 2010

Halloween Hairdos: Spider Web

Now this one does require some time so make sure you don't plan to do this with only 5 minutes to spare.  :)  Also, you can recycle this style to create LOTS of different looks.  I'll add some more tomorrow. You'll see that it is worth the time that goes into it because you can get a few days of styles out of it.
Here are the little spider clips my princess and I made specifically for this hairstyle.  Aren't they cute?!
Have the hair completely wet and begin with a very TIGHT ponytail in the back of the head.  Make sure you gather all of the hair up into it. 
Now grab whatever color of elastics you want for the netting.  We started ours by breaking the ponytail into 6 small sections and tying each off with an elastic 1/2 inch above the starting elastic.  You'll want to pull each section outward along the head so that they are spreading out.  
*Tip: Use small claw clips to hold the sections you are not working with in place.*
Divide each new section into two equal pieces.  Combine the right piece and the left piece from the adjacent section with an elastic.  Continue doing this around the entire head until all 6 elastics are in for your second row of netting. 
Continue adding rows of netting as far out as you can go.  (It will depend on the length of your princess's hair.)  When you've reached a point where you're netting is finished, simply roll any extra hair into a small twist bun and secure it with a tiny claw clip.  You could also curl the ends if you would like, my princess just had tiny ends left over. 
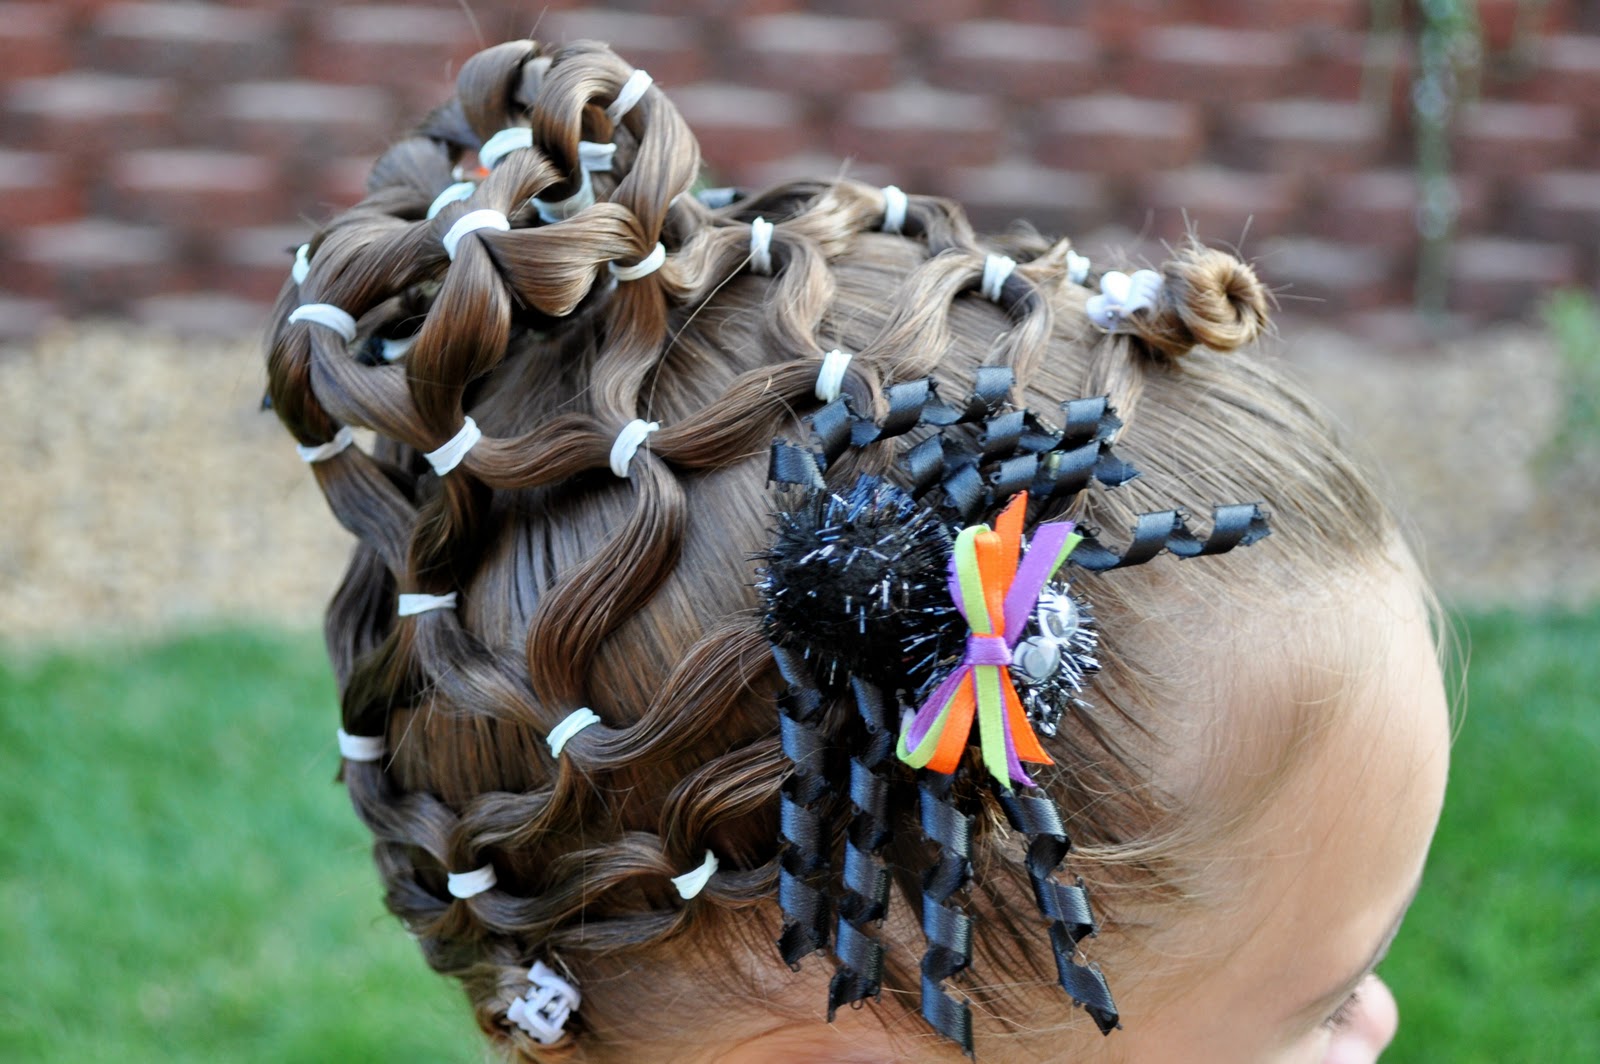
Now you can grab your spider clips and add them wherever you like on your web. 
Don't forget to check back to see the "Haunted House", "Trick or Treat Bag" and a couple fun updos you can do using this hairstyle.  :)

Wednesday, October 20, 2010

Halloween Hairdos: Neanderthal

This is a really simple idea just for fun or if your princess is going to be a Neanderthal for Halloween.

 
I got this bone from an outdoor skeleton kit that my husband is using as part of his cemetery in our front yard.  Make sure the hair is really wet and pull it all back into a tight ponytail. 
 Take a small section of hair from the top of the ponytail and comb it so that it's really smooth.  Place your bone at the ends of the section and then roll it down to the head - just like you would roll a curler.  Use a bobby pin on each side of the hair to hold it in place. 
Now Barrell Roll the rest of the hair up under the bun and bobby pin it into place as well.  A Barrell Roll is basically taking all the hair and (beginning at the ends) roling it up into itself and making the shape of a barrell.  (The same motions you did with the bone but there is no bone in the middle.)  Make sure your pins form an "X" for a stronger hold. 
There you go - Ugh!

Celebrity style: book launch style

Hilary Duff si-a facut debutul literar, Lauren Conrad a mai lansat doua carti, Tori Spelling a scos prima carte pentru copii, iar Lisa Rinna si Nicole Richie revin cu romane noi.
Toamna aceasta este plina de lansari de carti scrise de celebritati.
Pentru a-si promova cele mai noi creatii literare fiecare a optat pentru tinute care le caracterizeaza stilul personal - sexy, girlie, putin edgy sau casual.
Lauren Conrad a lansat doua carti in aceasta toamna, "Sugar and spice" si o carte de stil, "Lauren Conrad style".
LC si-a prezentat noile carti imbracata intr-o rochie alba din dantela Notte by Marchesa accesorizata cu o bentita subtire Jennifer Behr si pantofi Aldo.

Cu doi copii mici, o linie de accesorii si una de haine, Nicole Richie este o vedeta ocupata, dar si-a facut timp sa scrie un nou roman, "Priceless".
Pentru lansarea din New York s-a imbracat in blugi rupti, un tricou negru, jacheta din catifea Winter Kate si a accesorizat cu o palarie, esarfa Alexander McQueen si Christian Louboutin "Lipspikes".

Tori Spelling si-a lansat prima carte pentru copii "Presenting... Tallulah", eveniment pentru care a ales o rochie Vivienne Tam.

Hilary Duff si-a facut debutul literar cu "Elixir". La lansarea din New York a purtat leggings din piele Current/Elliott, blazer Stella McCartney si pantofi Yves Saint Laurent.

Lisa Rinna arata hot la 47 de ani intr-o rochie Herve Leger la lansarea romanului "Starlit".

Celebrity style: capele

Alexander McQueen, Marc Jacobs, Massimiliano Giornetti pentru Salvatore Ferragamo sunt printre designerii care, in acest sezon, au readus in prim plan capele.
Celebritatile le prefera in zilele reci de toamna ca variante mult mai stylish la jachete sau cardiganuri.
Preferata mea este capa reversibila alb/negru, din matase vintage din colectia de toamna/iarna 2010 Winter Kate a lui Nicole Richie.

Kim Kardashian cu o capa Thierry Mugler

Jessica Simpson

Lily Allen cu o capa Louis Vuitton pre-fall 2010

Tuesday, October 19, 2010

Halloween Hairdos: Monster Eyes

A little while ago I had a post called "Infinity" and this is just exactly that hairstyle with some fun things added to it.
(Please refer to that post if you need step by step instructions.) 
First you are going to need some eyeballs.  These are little glow-in-the-dark eyes that I cut in half.  I got these at the dollar store but I've seen them all over the place.  Poke a hole on the side of each one and feed bobby pins through them so that each eye has two bobby pins. 
 Once you've finished the "Infinity" hairstyle you can just pin the eyes right into the middle. 
We also grabbed two green pipe cleaners and wrapped them around a pen to curl them.  (Only wrap 3/4 of the pipe cleaner because you will need the rest to stick down into the hair.) 
 I tried to get a picture of the eyeballs glowing in the dark but the camera didn't like it much and the pictures were very blurry. 
My princess loved this hairstyle!

Monday, October 18, 2010

Halloween Hairdos: The Mummy

This is one of my favorite Halloween Hairdos and I've been waiting to do this one for a while. 
First you will need your bones.  Remember the skeleton garland I told you I got at the dollar store...
Well this is the head, arms, and legs from one of those skeletons.  (I used one of them in "The Coffin".)  So many wonderful uses for these little guys.  :)  I simply hot glued some bobby pins to them so that they could secure into the hairstyle.  Again, this hairstyle needs to have very wet hair to work properly. 
Start with a small Pull-Through in the front just for looks.  Now go ahead and create "The Cast" which I posted a couple weeks ago.  (Please refer to that post if you need step by step instructions.)  Once you've finished "The Cast" go ahead and grab your skeleton parts. 
Stick the skull right up in top and the legs up through the bottom so that only the feet are showing. 
Now grab both arms and add them on each side, about 1/2 inch below the skull. 
 Isn't this mummy awesome?!
  I also think it looks really nice without the arms but you can choose to do it either way.

Sunday, October 17, 2010

Halloween Hairdos: "BOO"

 Make sure the hair is really wet before you begin this hairstyle.  Grab a rat-tailed comb to make your parts - and try to keep them as straight as possible. 
First, section out the bang area and pull them tightly over to the left ear and secure them with an elastic.  Now make 3 parallel sections going from the top of the head down to the neck. 
 Pull the middle section up into a tight, centered ponytail.  Now pull the right section into a ponytail as well but keep the ponytail somewhat close to the part. 
Grab two bun molds (or cut the toe out of two separate socks and roll them into themselves to create a mold) and slide them over each ponytail. 
Spread the hair over the mold and secure it with another elastic over each mold.  Now twist and wrap the excess hair around the mold and bobby pin it in.    Move over to the left section and divide the ponytail from the bangs into two sections.  *Keep in mind that you can braid your "B" which ever way works best for you*. 
Start with the left little section and begin braiding straight down by the ear.  When you plate it down to where you can begin adding hair, start to French Braid it.  Keep going until you get to about 1 1/2 inches from the neck and start to turn your French Braid - making the bottom part of the "B".  Finish the bottom curve (only the rounded part - don't French Braid the middle section leading back to the beginning part of your braid) and stop adding hair into your braid.  Finish plating the hair you are holding with just a regular 3-Strand Braid.  Secure it with an elastic at the end and let it just hang for a minute.  Now go back up to that right section of your little ponytail and begin French Braiding that into the top part of your "B". Gather all of the hair into the braid by the time you finish with the top curve and then just finish the hair off with a regular 3-Strand Braid. 
Twist the two 3-Strand Braids together and then bobby pin them down to the head - creating the middle section of your "B".  Tie an elastic around the two braids when the "B" is finished and un-plate any remaining braid below the elastic.  Brush it out and then make just one braid of your choice with that hair. 
Tie a ribbon around the elastic right next to the "B" and you're all finished.  Stand back and look at it and you can read "BOO" across her head!
 This is the clip that we put in her hair later and it was perfect because it was a little ghost saying "BOO"!  :)