Wednesday, February 29, 2012

5-Strand Braid With Ribbon

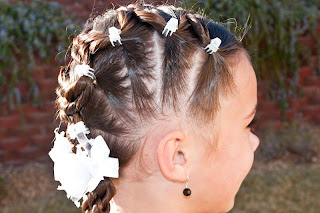
Today was "Dress as Your Favorite Character" day at school and my princess chose to dress as Spongebob Squarepants.
As you can imagine, I was at a loss for what to do to her hair.  I finally decided to just add some fun yellow ribbons to her hair for color and this is what we came up with.
It is a 5-Strand Braid with two of those strands being the yellow ribbon.  I just pulled the hair into two piggies and then wrapped an extra long ribbon through each elastic so that it was bent in half around the elastic giving me two strand in each piggie to work with. 
I divided the piggies into 3 equal strand each and then used the ribbon as the other two strands for the 5-Strand Braid.  If you do not remember how to do a 5- Strand Braid the video can be found here. 
You will start with your strands as follows: hair - ribbon - hair - ribbon.  Then just proceed to braid from that point.  When you get to the bottom of the braid you can secure it with an elastic and cut off any remaining ribbon.  Looks kind of cool huh! 

Heidi Klum look for less < $150

Heidi Klum is looking her usual fabulous self in this maxi/moto combo.  I love this dress she is wearing... the original by Acne retails for almost $600.  But this less expensive version gives a similar visual punch but at a far more friendly price!

get the look:
dress
jacket
sandals
bag

Tuesday, February 28, 2012

Michelle Williams Look for Less <$117

This look from Michelle Williams is the perfect menswear meets chic look! I love the navy blazer paired with cute black shorts and just a simple peep toe heel and red clutch! Perfect for wanting to look dressy in the spring!

Get the Look!
Clutch
Top
Blazer
Shorts
Heels

Monday, February 27, 2012

Puffy Braid Stegosaurus


A little while ago we did a post on The Stegosaurus hairstyle and this is a bit of a spin off on that.
  Begin with wet hair.  We started by dividing the hair in half with a part directly down the middle of the head.  Our part started a bit off-centered before going straight to the middle just to bring the bangs to one side. 
 Next we created two small sections up front by creating a part on each side from the center down to the ear.  Each side was secured with an elastic and then we used the Topsy Tail to create a regular Pull- Through.  
We created another section on each side of the part just behind that original and secured it into an elastic - making sure to include the ponytail from the first Pull-Through.  Now you should have a small ponytail on each side.  Work with one side at at time and grab a small section out from the top of the ponytail and comb it smooth.  Now feed it through the loop of your Topsy Tail, poke the Topsy Tail down behind the elastic and partially pull it through so that you have a loop just over the elastic.  (You can see how to do this with a video tutorial if you click on "The Stegosaurus" link at the top of this post.)  Go ahead and do this for both side of the head. 
Now create two new sections of hair just below the last and secure them into an elastic - Making sure to include the ponytail and Pull-Through hair from the section above.  (Note: be careful not to pull the loop out of shape as you include your Pull-Through hair into that new ponytail.)  From this point you will just repeat the steps from above for making your loop and then continue repeating the steps as you create new sections of hair to add in. 
Once all of the hair from the head has been added in, you will just repeat the steps as directed without adding new hair when you secure a new elastic.  Do this all the way through your ponytail and the length of the hair will determine how many loops are created.  As you are securing your final elastic, Only pull the hair half way through so that you create a loop of hair at the bottom as well for more of  a finished look. 
Go back up and add any hair clips that you would like.  We've just added some velvet black flower pins next to a few of the elastics. 

Reese Witherspoon Look For Less < $120

I am loving the gray and peach combo seen here o Reese Witherspoon.  She paired it with brown boots, which I would not have thought to do, but I think it works.


Source: people.com via Jackie on Pinterest

Get the look:


Friday, February 24, 2012

Friday's Film: Carousel Braid

This one has been floating around Pinterest and I really like the look of it. 
 This is our attempt at recreating the Carousel Braid and hopefully the video will help you as well. 
One of these days I will master the whole filming hair thing.  I still really struggle with creating a hairstyle from an angle.  :)
Here is what the finished product looks like.  Pretty huh!
Here is a side view and this braid looks good no matter how you look at it. 
This is a close-up of what we did on top of her head to start it all off.
We pulled the braid back to her ponytail, wrapped it around the elastic and then secured it in place with a Topsy Tail. 
For a fun little variation tey this "Squished Carousel Braid".  You basically just squish all of your twists up and secure the bottom elastic higher onto the ponytail.  Kind of neat how the add-ins all fan out!

Thursday, February 23, 2012

Kourtney Kardashian Look for Less <$98

Even pregnant, Kourtney Kardashian pulls out amazing fashion stops! I love how she wore an oversized button down to hide the bump but paired it with red skinnies, a fabulous tweed blazer and snakeskin pumps! This is a look that all women can love!


Get the look!
Skinnies
Blazer
Button-Down
Pumps
Necklace

Wednesday, February 22, 2012

Olivia Palermo Look for Less < $120

Olivia Palermo hits another one out of the park with a monochromatic navy blue look set off with a bold orange blazer - such a fun look!  She executes is perfectly!


get the look:
pants
top
blazer
flats

That's A Wrap

Here's a different kind of ponytail wrap for you.  It's very simple and has a neat effect.
I started this hairstyle by sectioning out the top part of the hair from ear to ear and then dividing that into two parts.  I made a Pull-Through out of each part and then a Regular 3-Strand Braid out of each Pull-Through. 
I then pulled the two braids to the back of the head and combined them with an elastic and unplated any remaining braid after that elastic.  I then gathered all of the hair that was down into a ponytail - making sure to exclude the small ponytail from my two braids. 
I left the large ponytail alone and grabbed my smaller ponytail from my braids and added a new elastic about 1 inch below my first.  I then added 4 more elastics, separating each of them by about an inch.  Now my small ponytail had 6 total elastics - one securing my braids and then 5 others about an inch apart. 
 I grabbed my Topsy Tail and poked it directly through the middle of the first inch section of my small ponytail.  I did this by bringing my Topsy Tail in from behind this first time.  Now feed the large ponytail through the loop on your Topsy Tail and pull it all through that first section on the small ponytail.  Now you're going to feed your Topsy Tail through the second small section by feeding it from the front this time.  Place the large ponytail through the loop and then pull it through that section.  Continue doing this - alternating feeding the Topsy Tail from behind and from in front.  Once you have finished pulling the large ponytail through all of your sections you can combine the two ponytails with one final elastic at the bottom.  Add a hair clip and you're finished! 

Tuesday, February 21, 2012

Olivia Palermo Look for Less <$117

Olivia Palermo never disappoints and I love this look! Its a perfect look for spring and so girly with the striped blazer and cute bow heels. I am wishing I had a striped blazer right now!


Get the look!
Blazer
Top
Pants
Heels

Monday, February 20, 2012

Woven Puffy Braids

This is a beautiful hairstyle but you will need a good 20-30 minutes to complete this one.  (Just wanted to give you a heads up so you didn't get frustrated on one of those "crunch time" mornings.)  :)
Begin with wet hair and create a part directly down the center of the head so that you now have two equal sides.  Section out a small area on one of the sides (right up in front) and secure it with an elastic.  Create a parallel section on the opposite half of the head.  Now you've got two small piggies on top to work with. 
Separate each piggie into 3 equal sections and twist each section.  Your princess will be a huge help in holding the twist for this hairstyle until you need them.  Have her hold the six twists while you create another section on one half of the head, directly under that first section.  Pull the 3 twists from the opposite half of the head over to that new section and secure all of that hair together with an elastic. 
Now section out a parallel new section on the other half, just below the first section and take the 3 remaining twists that your princess is holding and weave them through the first 3 twists that are already coming across the head. 
Weave them in an over-under patter and alternate which way your pattern goes with the different twists. 
 Once they've all gone through you can secure them in with the hair from your brand new section.
  Now you've got two piggies once again.  Comb out any remaining twist from before.  Divide each ponytail into 3 equal sections and create twists out of each of those so that you once again have 6 twists to work with.  Repeat the steps from above to create another woven section.  Depending on how large you aer making the sections on the head, you could have 3-8 woven areas going along the back of the head.  We have 4 here. 
 Once all of the hair was gathered, we finished off our piggies with a couple of Hawser Braids. (Two Corkscrews twisted together.) 
We then went through and covered each of our elastics with tiny claw clips just to give it a fancier look but this is not necessary.  Add some hair bows and you're all finished!

Emma Stone Look For Less < $105

Emma Stone is quickly becoming one of my favorite celebrity fashion icons.  She pulls off the effortlessly chic look oh so well!


Get the look:


Friday, February 17, 2012

The Stegosaurus

I've been having a lot of fun dressing up regular ponytails lately and here's another example.  We call it The Stegosaurus because it looks like the plates on it's back.
I'll start with the video because it will give you the general idea on how to make the rings:  
Remember that it is key to do this on wet hair so that the style will hold throughout the entire day. 
 Here is a view of the finished ponytail from the back.
You should be able to make it all the way down the ponytail as long as you segregate the strands of hair that you are creating your rings with.
Clear elastics seem to work the best because they don't stand out as much but you can use any type that you have.
Once you are done, you can go back and spread out your rings a bit to make them wider.  (This is totally optional.)

the IT list... February 17, 2012!


Happy Friday ladies!
Take some time to enjoy these links!
  • gs lillian is inspired by coral and aqua for spring... stop by to check out this gorgeous color combination and you will be inspired too! (check out gs lillian on twitter!)
  • the capital barbie shares this chocolate cream cheese cupcake recipe - as if we haven't had enough chocolate this week!  But this looks too good to pass up! (find the capital barbie on twitter!)
  • rachael really found the perfect sweater - don't you love it when that happens? Check out where she found it and how she styles it! (find rachael really on twitter!)
  • suze wears clothes lays out three fun outfits featuring a simple red top... I especially like this dressed-up/dressed-down look featuring classic All-Stars! (find suze wears clothes on twitter!)
  • stay in the lines styles up a perfect winter outfit featuring a great pair of red skinny jeans - see how she styles them and what her perfect winter day is! (find stay in the lines on twitter!)
  • good clean fun makes champagne cake pops and they look amazing and delicious!  Check out her handy work and the recipe! (find good clean fun on twitter!)
  • here and now snags the uber-popular leopard print skinnies that are all the rage these days for a great price!  See her secret source! (find here and now on twitter!)
  • live a lot somehow finds a way to look amazing when she isn't feeling great - I think the cozy scarf and sunglasses have something to do with it!
  • sweetie pie style has gorgeous garden inspiration... I know it's just what I need on these gloomy winter days.  Check out her finds and get inspired to start working in your own garden very soon! (find sweetie pie style on twitter!)
  • along abbey road is looking stylish yet casual in simple gingham - stop by her blog to commiserate with her "first world blogger problems." We've all been there! (find along abbey road on twitter!)
  • the tiemann girls round up their favorite eats in Austin - just in time for Texas Style Council.  I am for sure taking notes here! (find the tiemann girls on twitter!)
  • 100 inspirations features an Ali Larter look for less (and lesser!) - check out how you can get the bold red look for yourself! 
the IT list is produced weekly by jill of good life, for information on how you can be involved, click here!


Thursday, February 16, 2012

Reese Witherspoon Look For Less < $126

Reese Witherspoon winterizes a sweet floral dress with black tights and blazer.  This is a perfect wear now, wear later example, as a floral dress will take you right into Spring! 


Get the look:


Wednesday, February 15, 2012

4-Strand With Flair

I found this post in my archives and realized that it had never been published.  I haev doe a 5-Strand With Flair but never this one.  So here it is!

This hairstyle works great on either wet or dry hair. 
Begin by parting the top of the hair directly down the middle.  Now grab two sections of hair from the front - one on each side of the part.  Put one section in a clip and set it aside while you work with the other. 
Separate the section into 4 equal strands.  Take the strand farthest to your left and go over the adjacent strand and then under the very next strand.  (That left strand should now be in the middle/right position.)  Now take the strand farthest to your right and go under the adjacent strand and over the very next strand.  (That right strand should now be in the middle/left position.)  Begin the pattern again with the strand farthest to the left, going over and then under,  and continue until you get to the bottom of the hair, leaving about 1.5 inches unplated. 
Now, starting at the bottom of the braid, gently pull at the far right and left plates of the braid to loosen them up a bit and make them flair out more than the inside plates.  Continue doing this up to the top of the braid, gently playing with those outside plates to loosen them up.  When you've done that, go ahead and secure the bottom of the braid with an elastic.  Unclip the section that you set aside and create the same braid using the same plating pattern and the same loosening technique. 
Once that second braid is complete, combine it with the first braid at the back of the head, using an elastic.  (You can remove the elastic that was temporarily securing your first braid.)  Unplate any braids below the elastic so that the hair is loose. 
Now grab two more sections from the from of the head, just below the original sections. 
Create the same braid out of those sections and combine them at the back of the head as well. 
 Make sure to include the extra hair from the first two braids into that second elastic.  Unplate any braids below the elastic and lightly curl all the ends of the hair under.
Add a hair clip to the back of the head to hide the elastics and you're all finished!