Sunday, November 14, 2010

Picture Day Do

I'm not sure why my princess had her school pictures so late this year but the time finally rolled around and this is the hairstyle we chose.  (Even though I didn't even order any because I do my own pictures- but we will get a yearbook at the end of the year and her shot will be in there.)
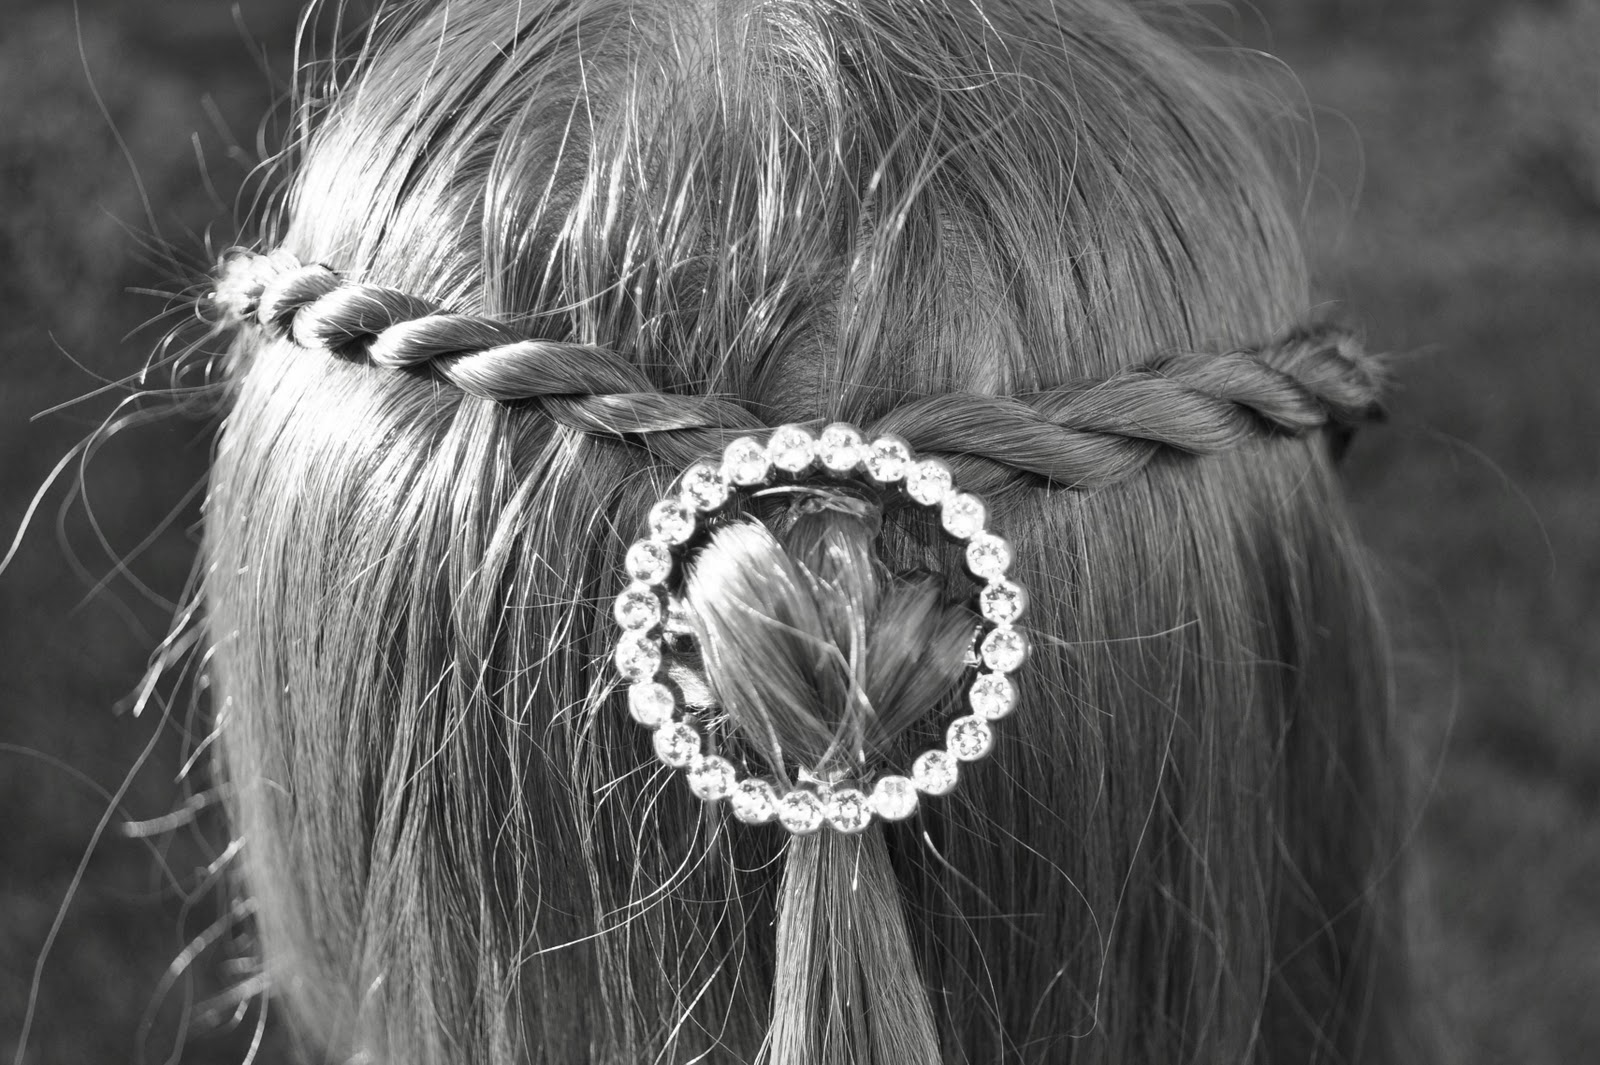
Begin by sectioning out the bangs from ear to ear and separate them (a little off-centered) into two pieces.  Use some product to keep the fly-aways down and pull the two sides tightly down to the back of the head - underneath the rest of the hair - where you will secure them together with an elastic.
Now gather another larger section of hair from ear to ear. 
 Before you secure it, you'll want to back comb the underneath a bit and then smooth out the top to give it some lift. 
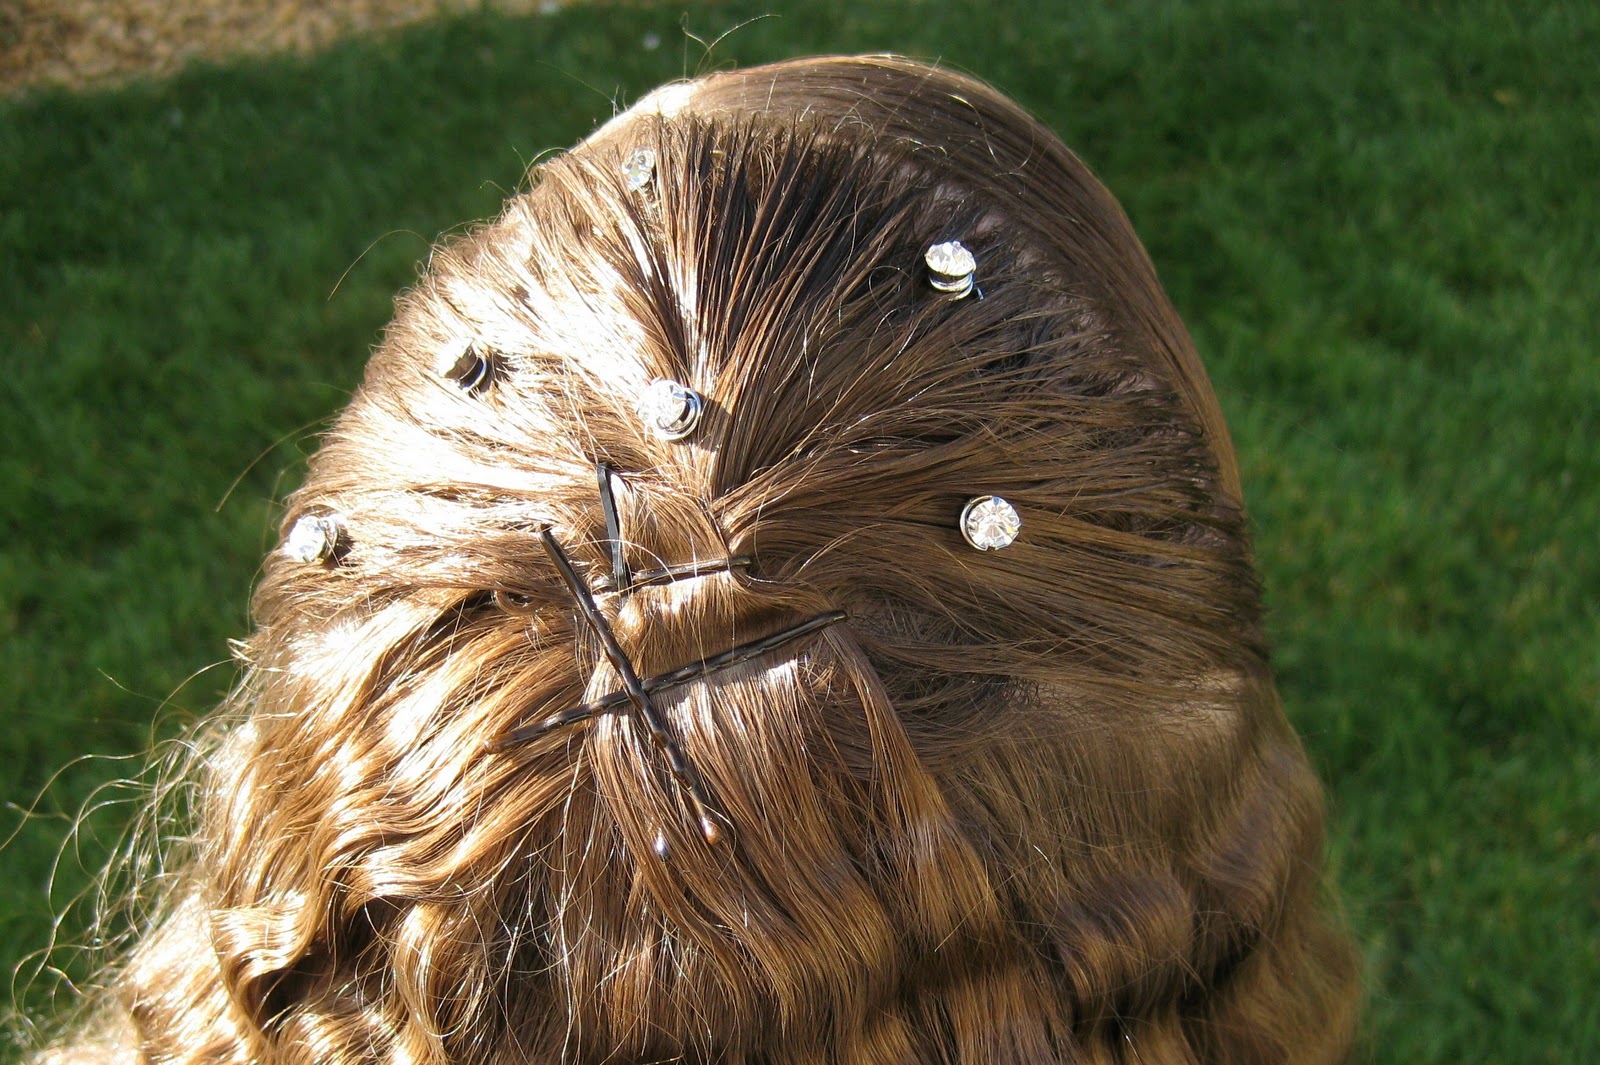
Now go ahead and secure it up with 6-8 bobby pins.  Make sure they're all making the "X" shape so they won't lose their grip through the day. 
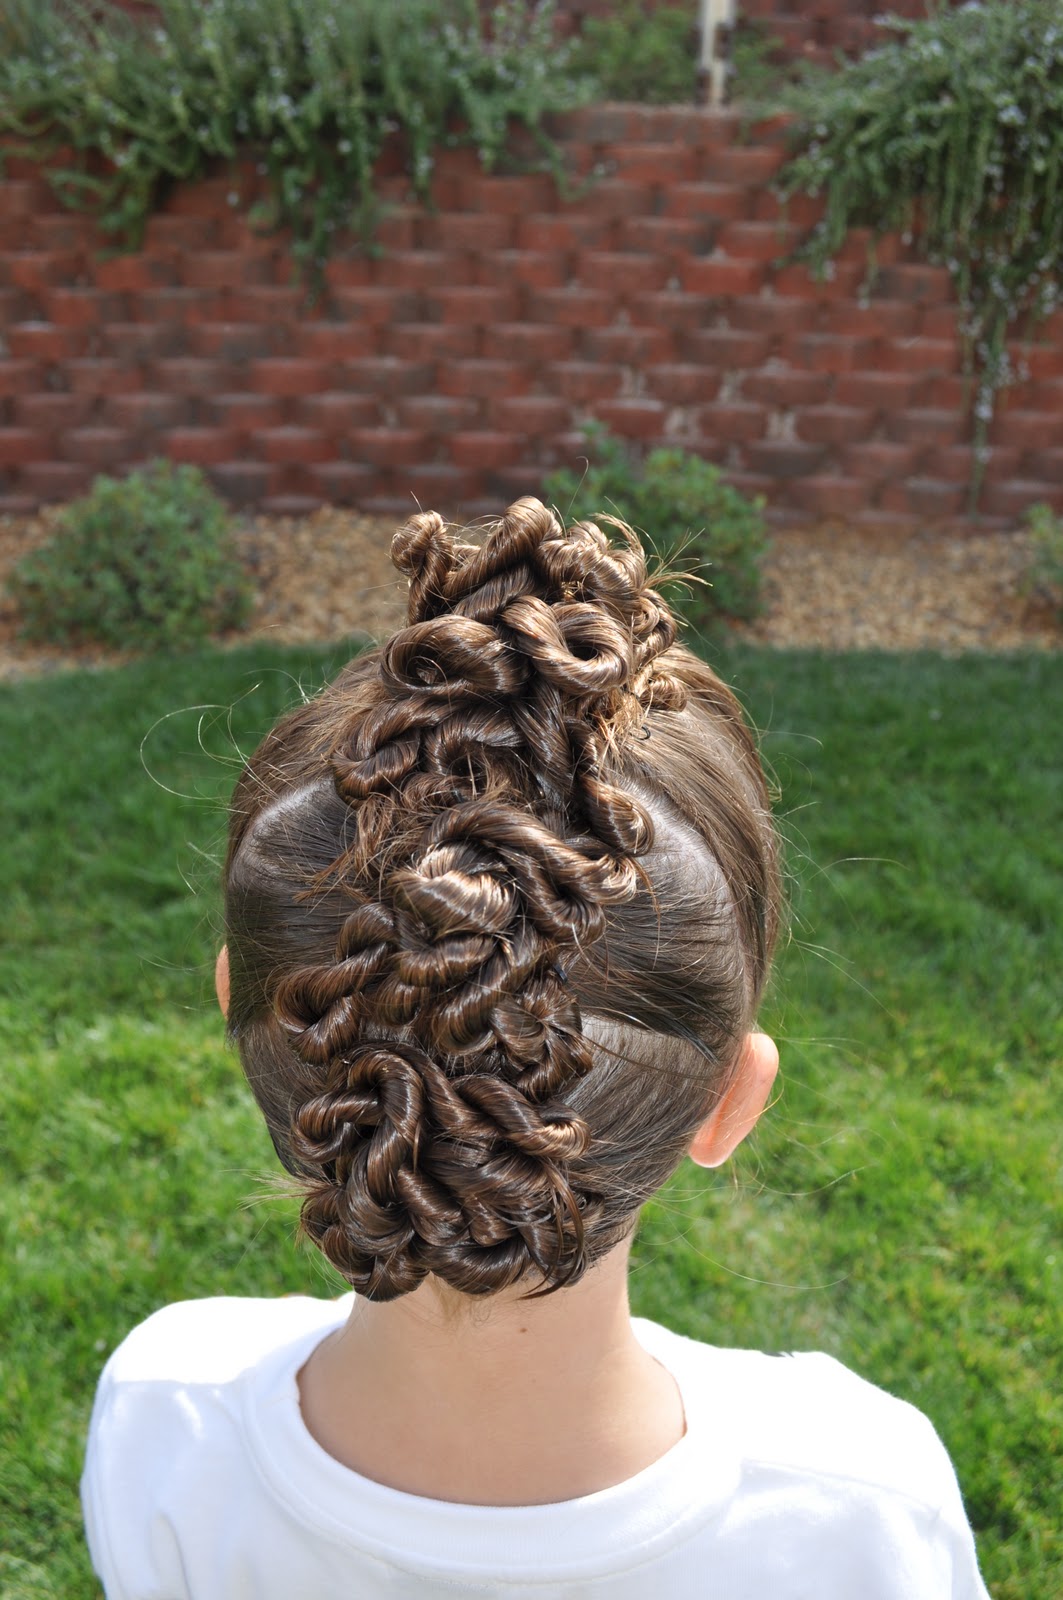
Now we grabbed out waver and waved the rest of her hair.  We own both the old fashion 80's Conair waver with the curved plates and the three-barrel iron waver.  The 80's one works SO MUCH BETTER!  Unfortunately their kind of hard to find now but keep your eyes peeled on Ebay or at yard sales.  :)
We finished it all off by inserting her jewel spiral accessories that just twist right into the hair.  We've made our own several times using the spiral paperclips found at scrapbooking stores but we actually purchased these ones at Walmart last week and absolutely love them.

Saturday, November 13, 2010

Barrel Roll Bun

This one is a really pretty one that is so simple. 
 Begin with the hair wet and tightly gather it into a high ponytail.  Now divide the ponytail into as many equal sections as you would like.  We've done 7 sections on this bun. 
To create a Barrel Roll you'll want to comb out a section until it is nice and smooth and then wrap it around your two index fingers and roll the fingers over themselves which will roll the hair down toward the head. 
Once you have a roll, secure it to the head with bobby pins. 
Do this with every one of your sections and you can have your Barrel Rolls facing any direction you like. 
When all of them have been pinned, spray the bun really well with hairspray. 
 We've finished ours off with some little jewels on spirals that we've just twisted into the rolls so they look like they're floating.  We've also added some jeweled bobby pins around the base of the bun. 

Thursday, November 11, 2010

Worm Mohawk

This was the hairstyle that we used in our "Cemetery" post but I realized that we never originally posted the hairstyle itself.  Better late than never! 
 First I sectioned off her hair into 4 equal sections going horizontally across her head. 
 I secured each section with an elastic right in the middle. 
 Now make sure the 4 ponytails are really wet and divide each one into 3 pieces. 
Twist each piece as tightly as you can and let them wrap themselves up and create a "Worm". 
Secure the end of the Worm into the hair with a bobby pin. 
Do this with every piece from every ponytail until you have lots of little worms.

Wednesday, November 10, 2010

Princess Pentagon

This hairstyle will be easiest right after washing the hair because then it's nice and wet and easy to work with. 
 Grab your rat-tail come and section out a pentagon shape right in the middle of the head.  Make sure all five sides are equal and have straight lines and then tie the hair inside the pentagon into a ponytail.
 
 Now from each corner of the pentagon you'll make a part straight out to the hairline.  Do this on ever corner and you will end up with 5 individual sections. 
Tie each off with an elastic close to the pentagon shape. 
 Create two braids out of each of the elastics and then pull the braids all up into the center ponytail and combine it all with another elastic. 
 You'll now have one single ponytail and you'll want to brush it all out until it's smooth.  Now make a Messy Bun with the ponytail and spray it all with hairspray. 
Just add a ribbon to finish it off.

Tuesday, November 9, 2010

Accessories and Kissy Lips

I was at Hobby Lobby the other day doing a bit of shopping and I came across these awesome little accessories.
  This one is a black vinyl flower that we've clipped in her hair but it also has a pin clasp on the back so you can use it on clothes.
Here's another one we bought that we pinned to her jacket but it can also be used as a hair clip.  I think that' such a smart idea to have both options on the back of the flowers.  I think I'm going to start doing that with some of our accessories from now on.
To show off her new flower we did a Kissy Lips Messy Bun.  These are really easy but you want to have your elastics handy.  Start with a regular ponytail.  Now grab another elastic and wind it like a ponytail until the last time around when you're only going to pull the hair through the elastic slightly.  Now this will give you a little poof.  Grab another elastic and go around the entire poof and the extra hair until the last time around when you will pull the entire poof through but only a little bit of the extra hair.  This will give you your second poof.   
Rough it up a big with your fingers and don't be afraid to pull at it a bit to give it that messy look. 
Our church had a fun little activity day (Super Saturday) where we made these fun bow holders. 
This was a perfect craft for us because my princess is a dancer and has TONS of hair accessories! 
 Cute huh!

Monday, November 8, 2010

Recycled Treasure

I remember in the late 80's owning a little accessory that you would pull your shirt through.  I don't remember the official name of them but they were a circle with a bar through them. 
Anyway, I was at a yard sale the other day and found this little one that I thought would be perfect for a hair accessory.
I decided to do two French Twists on the front of her head. 
 Those twists led into two Corkscrews on the sides. 
I joined the two Corkscrews at the back of her head with an elastic and then fed the extra  hair through this little accessory. 
 I secured it on the back with an elastic when I was all finished and she had some fun little bling in her hair for the day!

Sunday, November 7, 2010

Haircut and Church Do

My princess was in need of a serious trim to her hair.  I usually try to trim is about every 3 weeks but it had been a while and her ends were always getting tangled.
Here she is after the cut and we took a good 3 inches off just so it wouldn't be so long.  Her hair seems to grow fast and I'm sure we'll be trimming it again in no time.
We had church that morning so we decided to do something straight and pretty.  I started by parting out 2 inches of hair from ear to ear.  I then parted that section a little off-centered and created two pieces.
 
 I set the two pieces aside and then grabbed a small section of hair from behind the left ear and braided it all. 
Then I pulled the braid along the ear-to-ear part just like a headband.  Now tuck that little braid inside the hair behind the right ear and secure it with bobby pins. 
 Now braid each of the two front sections.  Pull the two sections over the headband braid and tuck them under the hair.  Secure them with bobby pins and softly smooth the hair over to hide the pins.  You'll end up with a nice, soft, hair-down look.