Friday, November 30, 2012

Friday's Film: Wrapped Band

This is a very simple style that you can do any morning and not have a huge time commitment.  You will need a stretchy headband and a Topsy Tail if you have one but it's not required.  
Pretty simple huh!
 Here's what the back looks like.
 Here's a shot of the side that wasn't shown in the video.
You can choose any sort of fancy stretch band to use.
I love hairstyles that are fast and easy!
*AWESOME PRODUCT ALERT*
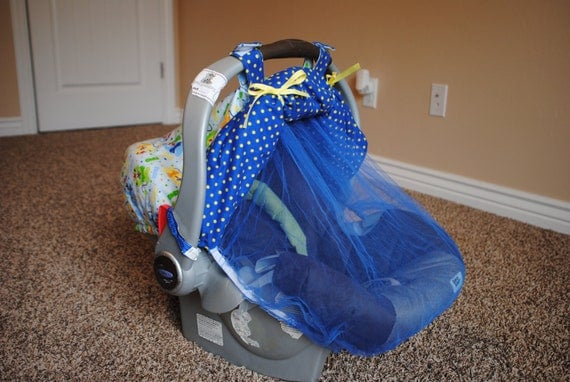
Car Seat Cover with Bug Net
So I don't promote really anything on  this blog but you have to check out these car seat canopy's with the bug covers.  They are FANTASTIC and I have loved mine!  My cute sister-in-law makes them and you can see her shop on Esty here so go check it out!


How to Create This Elegant French Twist

Steps
1. Start with dry or damp hair. Hair can be curly or straight.
2. Comb through hair with your fingers and pull it all over to the desired side.
3. Take your hair into one hand like you are going to create a low side ponytail.
4. Twist hair forward (towards your face) starting with the hair behind your ear, from the roots. Twist hair a couple inches down the ponytail. I stopped mine just below the earlobe.
5. Now secure the twist with bobby pins. Place pins at the base of your twist where the hair is folded in at your scalp. For the best hold, take the lip of the pin and push it in and away from the twist, then push it back into the twist, up against your scalp. This will tightly secure your twist. Set the style with your favorite hairspray and prepare to turn some heads!

the IT list... November 30, 2012!


It's hard to believe it's December tomorrow! 
Enjoy your weekend... and these links!
  • Laura Wears dresses up her cozy fair aisle sweater with a blazer for a chic, winter-ready look! Pop over to check out her cute stocking cap, too! (find Laura Wears on Twitter!)
  • Peach Gingham pairs polka dots with a fur vest - what an amazing combination! The perfect casual back-to-work outfit! (find Peach Gingham on Twitter!)
  • A Devine Life is mad for plaid this season and pairs it with heels and pearls - a beautiful classic look! (find a Devine Life on Twitter!)
  • Rach.E. Cakes is jumping on the animal trend in an outfit that is cute and comfortable enough for a long day of traveling at the airport! Pop over to see what furry friend she is sporting! (find Rach.E.Cakes on Twitter!)
  • Behind The Dressing Room Door gives us the scoop on a mini sale going on at Anthropologie! Definitely a good time to stock up on dresses and sweaters! (find Behind the Dressing Room Door on Twitter!)
  • Living After Midnite found a gem of a bag at a recent sample sale and she hasn't put it down since! Head over to see her fabulous new bag! (find Living After Midnite on Twitter!)
  • Fancy Francy shows us how to incorporate tights and leggings into our winter wardrobe! Pop over for some style tips and to check out these two looks! (find Fancy Francy on Twitter!)
  • The Second Best is rocking her favorite winter staple that we all have - even men! Head over to see what it is and where she found it! (find Second Best on Twitter!)
  • Ishi is all puffed up in her favorite winter coat and it extremely warm, but still chic! Go check it out - such a great price point, too!
  • Fleurani shows us that black and blue really do go together! A sophisticated look with a fun, unexpected twist!
  • Rachels Look Book proves that neon isn't going anywhere soon with this festive but comfy look! Her sweater is to die for - a must see! (find Rachel's Look Book on Twitter!)
  • See Mo Go is finally pulling out her favorite Christmas dress now that Thanksgiving is over - perfect for the holidays! So cute! (find See Mo Go on Twitter!)
  • My Thrifty Chic is rocking some fun printed pallazo pants she found while thrifting - such a great find at an even better price! (find My Thrifty Chic on Twitter!)
  • Second Street East is dreaming of spring even though winter is just beginning. Head over to check out the fresh and bright dining room she loving this week! (find Second Street East on Twitter!)
  • Sweetie Pie Style recreates an outfit that would be perfect for a holiday party with friends in gorgeous winter whites! She also gives some great tips for dressing in monochromatic tones!! (find Sweetie Pie Style on Twitter!)
the IT list is brought to you weekly by Jill of Good Life and edited by Michelle of Second Street East.
For more information on how you can be involved - click here

Thursday, November 29, 2012

How To Tease And Fluff Your Hair

How To :
  • Step 1 : At the end of your part, separate a 1 inch section of hair.
  • Step 2 : Starting half-way up the length of the hair (not just at the root!), tease downward repeatedly using a teasing brush. Don’t be afraid to over-tease, as you can lessen the volume when you smooth. Spray section.
  • Step 3 : Working backwards, separate and tease a second and third section of hair, and spray each section.
  • Step 4 : Use a boar bristle brush to smooth out the teased hair. You can also use the tail of your teasing brush to fluff and give shape. Spray again.
  • Step 5 : On left side of your part, separate a 1 inch section of hair, then tease and spray. Then tease and spray a second and third section working down the side of your head. Repeat on the right side of your part.
  • Step 6 : Smooth teased hair on the sides of your part, fluff and spray.

Wednesday, November 28, 2012

Make Inside-Out Half Up Braid


Steps
Step 1: Gather a small section of hair on one side to begin the inside-out braid.
Step 2: Continue weaving the sections of hair under the braid.
Step 3: Continue braiding down the side of the head.
Step 4: Braid until you reach the center of the back of the head.
Step 5: Securely bobby pin the braid to the center.
Step 6: Begin the inside-out braid on the opposite side.
Step 7: Continue braiding until you meet the other braid at the back.
Step 8: Securely pin the braids together. Curl as needed!


Tutorials You Should also see :

Punky Ponytail Hair Tutorial


Step One:
Brush all of your hair through to ensure your hair is free from any knots and tangles :) I love popping in my Quad Weft hair extensions to make this super thick and on-trend. ♥
Step Two:
You will need to section off the top section of your hair like I’ve shown in my pics; to do this, take the tail end of your styling comb and create two straight lines either side so you are left with a section around 2 inches wide.
Step Three:
Take this section back to the crown of your head and section off with a hair band while we tend to the rest of the hair. :)
Step Four:
You should be left with most of your hair down and the top section secure in a hair band. You will need to take another hair band and secure the remaining hair so that you are able to concentrate on the top section without any pieces of hair interfering from the bottom section.
Step Five:
Now, we’re going back to the top section to create the punky ponytail; you are going to be french braiding this section right to the back to where this section ends. Start at the front by taking three equal sized sections and begin a simple three strand braid; you will then need to take a section from the left side and add it into the closest strand in the braid. Continue this with the right side too, alternating between the left and right side. Braid back to where your crown is and neatly secure in place with a hair band.
Step Six:
Now, for the bottom section, you’re going to need to brush all of the hair back gently and neatly into a ponytail, ensuring you get the end section of the braid into this too; then you can take out the hair band from the braid so it falls with the rest of your hair in the ponytail. :)
Step Seven:
Once you have secured your hair into a ponytail, you need to take a small section from the underneath of your hair and wrap this around the base of your ponytail. This will hide your hair band and make the hairstyle look super sleek. :) Secure in place with a bobby pin, ensuring that the hair band is hidden and the ends are neatly tucked away. :)

Tutorials You Should also see :

How to do a fishtail braid

Fishtail braids look harder than normal braids, but if you think of them as two ponytails it’s really simple to do.
Steps :

1. Put your hair in a ponytail. Once you’re more practiced, you can skip this step, but it’s a must to keep this braid in place, especially if you have layers cut in your hair.
2. Split your ponytail in two. Hold one side in each hand and keep these separate as you braid.
3. Cross a small section from the left to the right. Take a small piece of hair from the left side of the left ponytail and put it in the right ponytail.
4. Repeat on the right. Take a small piece of hair from the right side of the right ponytail and put it in the left ponytail.
5. Repeat this process all the way down the ponytails. Each time, cross a small piece of hair from one ponytail to the other side. As you move down the ponytail they cross over, forming the fishtail braid.
6. Tie the end and stretch it out. Secure the end of your fishtail braid with a small, clear elastic. Gently pull at the sides of the braid to stretch it out. This makes your hair look thicker and fuller, and emphasizes the shape of the braid.

Tutorials You Should also see :


Tuesday, November 27, 2012

The Wrap Around Side Braid

Steps :
1) Start with a dramatic side part.
2) Take a collection of hair from where your part starts and begin the braid only adding in hair from the front side or the side of the braid closest to your face or neck. This makes it an open, or one-sided french braid.
3) Keep braiding from underneath the braid, only taking hair from the front side of the braid.

~Always keep the braid on top of the loose hair you are braiding in. 
~If you mess up, it's OK. Unbraid the hair until you can find the 3 strands again. Stay calm and keep going. If it's not perfect it is ok. Sometimes the flaws in a braid make it better.

4) Once all the hair is braided in, continue with a standard braid the rest of the way down, or put it in a messy bun, or keep a smaller braid going with part of the hair left out and do a messy bun with a braid in it. There are so many options!


Tutorials You Should also see :

Make A Twist And Tuck Braided Updo For Hair


Steps :
1. Begin with dry hair. If your hair is silky textured, I suggest adding a mousse or a spray gel to help coarsen up your texture. In these pics, I put a slight wave into my hair by using a 1 3/4 curling iron.
2. Take a section of hair in front of one of your ears and twist it back,  going back to a few inches down from crown. Repeat on the other side.
3. Secure the twists together at the back of your head with an elastic.
4. Section your hair in three and start a loose braid.
5. Braid your hair loosely to the ends of your hair and secure with an elastic.
6. Roll your braid into and under your twisted ponytail and bobby pin it into place.
7. To make your hair fuller, fray your braid out and pin into desired place.
8. Finish with a medium hold hairspray.

Miranda Kerr Look for Less <$110

I am loving this look from Miranda Kerr, very bohemian flair but so chic. You can dress it up with heels or dress it down with cute ankle booties like Miranda!

Get the Look!
Skirt
Jacket
Top
Hat
Booties

Make A Faux Bob Hair

Steps :
  1. Melville says to begin by creating a deep side-part on the left side of your head then pull all of your hair to the right. Leave the hair on the front right side of the part loose.
  2. Starting from the left side, begin braiding your hair, except for that loose front section, into a thick, tight braid. Pull hair from the right side in as you go, to overdirect the braid toward the right.
  3. Secure the braid with an elastic, then roll it under and tuck beneath the ear to hide it.
  4. Once the braid is tucked and rolled, use pins to hold it in place. If any strands comes loose from the braid, tuck them back in place with a bobby pin.
  5. If you've been flirting with the idea of going short, this can be a great, no-commitment way to test it out. It's also an innovative way to keep your hair off your neck and back, helping you stay cool in the sweltering heat. 
  6. This style works best on girls with layered hair, but it can also be done with long hair to create a retro side sweep.

Monday, November 26, 2012

Wrapped Around Half Updo

How To Style :
  1. Use a flat iron or large curling iron to softly curl the ends of your hair.
  2. Starting at the crown, push up a small section of hair until it’s the size that you want and pin it in place. Pin a few more pieces like this all through the crown to create a nice shape.
  3. As you move down the sides, wrap the hair on the left over to the right, and vice versa, pinning each side wrapped across the other side. Take 2-3 sections for each side.

Make A Braided Bun For Your Hair

How to Do :
Step 1 : Section your hair off into five braids: three in the back, two in the front. Secure each braid with an elastic at the end.
Step 2 : Starting with the back, take the first braid and twist into a flat bun against your head, anchoring with bobby pins as you go.
Step 3 : Wrap the next braid against the first, being sure to tuck the elastic out of sight. Secure with more bobby pins.
Step 4 : Repeat Step 3 with the third braid.
Step 5 : Finally, take the two front braids and wrap them around your nearly completed bun, being sure to hide the elastics and securing each braid with plenty more bobby pins. Finish off with a shot of hairspray to set the style.


Tutorials You Should also see :

How To Make a Messy Ponytail

This hair style should be messy! Don’t worry about the chunks of hair being uneven when you grab them. IT will still be lovely!
You'll need : Hair pins, Hair tie and Hair spray


Tutorials You Should also see :

Taylor Swift Look For Less < $110

How cute and classic is this look on Taylor Swift? You really can't go wrong with polka dots and burgundy this winter!


Get the look:

sweater (or this is the exact one Taylor is wearing-kitty in the corner and all. And it's not that expensive!)
pants, shoes, bag


Sunday, November 25, 2012

Make A Braided Bun

I’m all about easy hairstyles for the beach that are quick, but still stylish. I’ve been doing some sort of variation on a braided bun for years, since it keeps the hair out of your face at the end of the day, The best part is that it’s not supposed to look too perfect, so you can just throw it together.


Tutorials You Should also see :


Make A Curly Hair From The 80s

How To Style :
  • Step 1 : Before bed, wash your hair. When it is almost dry but still damp grab a section and start twisting it all the way down. The bigger the sections the bigger the curls.
  • Step 2 : Twist the twists of hair into mini buns and secure with bobby pins, until your whole head is done.
  • Step 3 : Go to sleep.
  • Step 4 : When you wake up carefully unwind all of the buns.
  • Step 5 : Use your fingers and start to pull apart and separate all of the curls (do not use a brush, this will make the hair frizzy).
  • Step 6 : If there are any ends that didn’t curl enough feel free to use a curling iron to make final touches.

Saturday, November 24, 2012

4 Beautiful Braided Hairstyles


4 Beautiful Braided Hairstyles


Tutorials You Should also see :

Make A Super Quick Waterfall Braid

How to Style :
  • Step 1 : First brush through all of the hair to ensure there are no knots or tangles, Then take a section from the front of your hair line. Split this section into three equal pieces and begin to create a three strand braid. Making sure you are braiding along your head, not downwards, otherwise you will end up with a droopy looking braid!
  • Step 2 : Once you have started your braid you will be adding sections from the top of your hair not the underneath!! This is how you get the effect of the waterfall. So, each time you are braiding, you will be adding a section from the top of the hair and continuing to braid, dropping the section that you have just braided and then braiding and adding a section from the top again. Continue doing the above steps until you are half way around your head.
  • Step 3 : Secure your braid with a rubber band , Then give your hair a tousle with your hands, Spritz with hairspray to flatten any wispy bits of hair sticking out and then you’re ready to show off your waterfall braid and enjoy!